Copyright © 2011-2026, Paul Scrivens-Smith

Copyright © 2011-2026, Paul Scrivens-Smith

All rights reserved. This work may not be reproduced, in whole or in part, without the prior written permission of the creator.

Showing posts with label American War of Independence. Show all posts

Sunday, 26 April 2015

Guilford Court House at Salute 2015


After our Battle of Keren game at Salute last year, Steve Jones said he would like to put on a re-fight of Guilford Court House at Salute 2015 and was keen to do the whole lot himself.

Steve already has a huge collection of beautiful American War of Independence figures, but if you check out his blog posts over the past year you will see that he has been adding more and more troops to this stunning collection.

Set up and ready to advance on the Carolina Militias

Well, Friday night it was time to set off, John Grant and Steve Metheringham met me at the office and we loaded up the Flying Satsuma and it was off down to the Premier Inn at Waltham Abbey a quite easy journey for a Friday evening and we were there at about 1800, checked in and were in to the Bakers Arms for a swift half before picking up Tom Webster-Deakin from the train station.

By the time we were back at the Bakers Arms Steve Jones and James Morris had arrived to complete the team for the game. After a few beers and a rather good dinner it was off to bed at about 2300 with the alarms set for 0630.

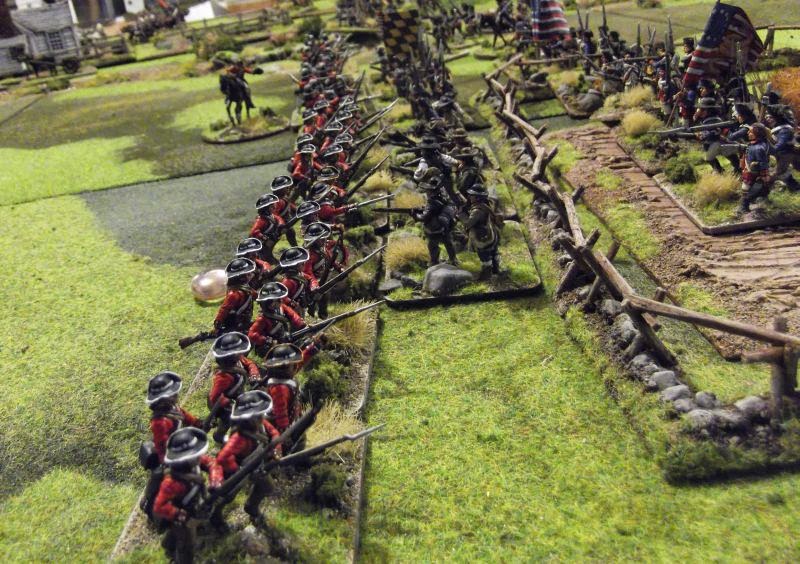
Clearing the first line the British advance on the Virginia Militias
I had quite a good nights sleep and was up before the alarm went off and by 0700 we were all showered and assembled in the car park. Four of us are wearing our rather natty shirts that Mog had done a cracking job on the design, unfortunately, due to starting a new job Martin was unable to join us this year. It was then time  for the short hop on to the Excel centre stopping for a McDonalds breakfast on the way, this is about the only time every year I eat anything from McDonalds and I think one a year is about enough.

Parking up at Salute we pay the eye-watering £15.00 for each car to park at for the day and carry up or first armfuls of terrain, figures and other goodies. We leave Steve at the table and continue the relay down to the car and back a couple of times each, cursing that we parked a bit too far from the entrance to the venue.
Having cleared the Virginia militia on the left the 23rd push on

With all the figures, terrain and what-not at the table, Steve insists that he set up the terrain and figures while we bugger off and take a look around the show. I pop to Gripping Beast to pick up a pre-order of some more WWI French for myself and Dave for the ongoing Verdun project, I then go to Warbases to pick up my pre-order of 20mm skirmish trays and decide to splurge on a load more on some 25mm skirmish trays for the aforementioned Verdun game.

Steve is with me and we both say hi to the Curteys, Steve picks up some Macedonian commanders and I get some lovely resin casualty markers for those Late Romans that will get painted one day. On to Minibits I pick up some dice frames and then it is back to the game where everything is set up and ready to go.

Continentals line the other side of the valley
Steve J gives us a briefing, Steve M and John will play the Rebels, Tom and James will play the Loyalists while myself and Steve J will keep the game going.

We are very near the entrance and can see the huge queue forming outside, at 1000 the flood gates are unleashed and a tide of humanity sweeps into the hall.

The team, L-R Tom, John, Steve J, James, myself, Steve M
After waiting for the initial wave to pass, while the table is really busy with viewers, we start the game. The British advance and despite a setback on their left, the first line of Carolina Militias do a sterling job, being much more resilient than their historical counterparts. The Von Bose regiment is even driven off in disorder while the 33rd Foot suffer excessive casualties.

However, exploiting the breakthrough on their left the flank companies of the 23rd Foot roll up the rebel line and after rallying and regrouping the British press on to the second line of Virginia militiamen.

Steve Jones with his best-painted award
In much the same way, these troops perform much better than their historical counterparts and the casualties are increasing on the British line that starts to become fragmented. The dice deities are really favouring the 'Tea-chuckers' while a rain cloud hangs over the Loyalist lines damping their powder.

On the British left the 23rd Foot press on through the woods to the fence line supported by the now rallied 33rd Foot, but on the right it is a catastrophe. The 71st Highlanders charge home into the Virginia Militia but are stopped by a crashing volley. The militia commander in an act if temporary insanity cries for his brave boys to follow him and with a whoops and a wait throws them on to the Scots. In the ensuing combat the dice favour the Rebels and the 71st Highlanders are broken.

The 71st Highlanders and 1st Foot Guards are pushed back to their start lines
In another poor show for the British the 1st Guards are badly disrupted by musketry and rifle fire and are then broken by a charge of Lee’s legion Light Dragoons. A terrible day for the British with only the 23rd and 33rd Foot making it through the woods and having to withdraw unsupported.

We were all very pleased for Steve Jones when the game was awarded the Best Painted award from the dozens of games at the show and the public feedback was very positive.

The Rebels for an unassailable position on the ridge

I met and chatted with loads of old friends and also got to do much more spending than usual for a Salute. As well as the stuff I picked up before the doors opened I also managed to get a couple of packs of Guardia Civil from Empress a good sized section of trench from Kallistra  (I don't like the hexes though so will be doing something about that) and went back to Gripping Beast to pick up some Renedra bases in the main for those WWI French.

I really enjoyed Salute again and meeting up with old friends. My only comment is, please people take a shower and ensure you use some deodorant, the vast majority of gamers were very good but we did have one stinkie attach himself to the table for 15 minutes - phew.

The British retreat to their start lines
Anyway to finish on a positive, Steve put on a great game and the rules that he wrote, based upon Fire and Fury, flowed really, really well. He heartily deserved the Best Painted award.

Some more images from the game, I only had my phone camera but am happy with how they came out.


Wednesday, 18 June 2014

Polly Courthouse - an AWI pick-up game


Yesterday evening at the wargames club Mick, Martin, Ian and myself had an American Revolution game using Black Powder rules.

Loyalist Militia
The last time I used my collection of 6mm AWI figures was back in March 2013 which was the only time they had been used. This game was long overdue.

A few weeks ago I was lucky enough to play Steve at a game he hosted. He is writing the Black Powder AWI source book for Warlord Games so I adopted some of the things we played at his in this game.

This was very much a throw it on the table and see what happens game. Martin and I played the British and we used:

  • Commander in Chief SR:8, Battery of foot artillery
  • Brigade Commander SR8. Unit of Grenadiers, unit of Light Infantry, unit of Skirmishers
  • Brigade Commander SR8. Three units of Line Infantry, unit of Skirmishers
  • Brigade Commander SR8, Three units of Line Infantry, unit of Skirmishers
  • Brigade Commander SR8, Three units of Militia, Infantry, two units of Skirmishers

British lines advance across open ground

Mick and Ian took the Americans and used

  • Commander in Chief SR:8, Two batteries of foot artillery
  • Brigade Commander SR8, Four units of Continental Infantry, one unit of Continental Skirmishers
  • Brigade Commander SR8, Four units of Continental Infantry, one unit of Continental Skirmishers
  • Brigade Commander SR8, Four units of Continental Infantry, one unit of Continental Skirmishers
  • Brigade Commander SR8, Four units of Militia, two units of Riflemen

Here are the stats we used:

Unit
Type
Armament
HtH
Shooting
Morale
Stamina
Special
British Line & Light Infantry
Infantry
Smoothbore Muskets
6
3
3+
3
First Fire
Reliable
Elite 3+
Tough Fighters
British Grenadiers
Infantry
Smoothbore Muskets
7
3
3+
3
First Fire
Reliable
Elite 3+
Tough Fighters
British Skirmishers
Small Infantry
Smoothbore Muskets
4
2
3+
2
Reliable
Elite 3+
Tough Fighters
Continental Infantry
Infantry
Smoothbore Muskets
6
3
4+
3
First Fire
Continental Skirmishers
Small Infantry
Smoothbore Muskets
4
2
4+
2

Militia
Infantry
Smoothbore Muskets
5
2
5+
3
Unreliable
Wavering
Riflemen
Small Infantry
Rifled Muskets
4
2
4+
2
Sharpshooters
Artillery
Artillery
Smoothbore Artillery
1
3-2-1
4+
2

As we were playing in 6mm we used half distances.

The table was set up as per the aerial photograph, and we randomised where each brigade would arrive:
The early stages

  1. Does not arrive this turn
  2. Left flank D6x3" from corner
  3. Left base edge: D6x6" from corner
  4. Right base edge: D6x6" from corner
  5. Right flank: D6x3" from corner
  6. Brigadiers choice 

The British took first turn, the Light and Grenadier brigade would appear on the left flank but failed their order test so did not appear. Both the infantry brigades rolled a 6 so came up the middle, one brigade in column up the road and the other into the woodland. Finally the militia appeared behind the woods and skulked around waiting to see where they would be needed - or hopefully not.

The rebels countered and rolled well for their arrival points with two brigades of Continentals in the centre to counter the British and one on the right to counter the flank companies. Rolling a 6 for their militia they were deployed against ours.

Fire-fight around the farmstead
The British column pushed up the road towards the farmhouse and their skirmishers were soon ensconced there, however the front battalion was caught in line and shot up pretty badly by the advancing rebels. The fight around that farmhouse soon developed and became a pivotal point of the battle.

On the British left the flank companies were caught advancing up the road by a sweeping advance of the Continental brigade, however after the initial shock of the fire, the Grenadiers and Lights soon formed line behind the fences and were engaged in a brisk fire-fight with the Continentals.

Grenadiers near the burial grounds
On my right, my militia refused anything but the most sluggish advance, however this was not a big problem as the Rebel militia were similarly shy.

As the battle developed the flank companies continued their fire-fight against the Continentals ranged against them, despite being outnumbered 2:1 they were making good use of their superior morale and the advantage of cover and the Rebels looked rather shaky.

In the centre the volleys rippled  back and forth, the Continentals launched a charge but were beaten back. Another Continental unit launched a charge at one of the British lines and started probably the longest combat I have ever encountered in a game of Black Powder, for about ten player turns this combat raged back and forth with no side gaining a clear victory and ending in a draw in many of the phases. At the end of the game this combat was still taking place.

Grenadiers and Lights get the advantage

However, the superior quality of the British was starting to tell, the Grenadiers launched a charge and despite being disordered by the reaction fire swept away their adversaries and breaking that Brigade. The British in the centre broke their opposing brigade and the Rebels were broken. Just as the two Militia forces had started to trade shots.

A great game and I really must try to not have 15 month breaks between my 6mm AWI games.

All the British are Adler Miniatures painted and based by myself. All the Rebels are Baccus painted and based by Mick.

Longest combat - EVER!

British Artillery


Thursday, 15 May 2014

Belated American Rebellion reinforcements

Following the rather spiffing game that Steve hosted last Friday I cane home all enthused and painted a few more of the Adler Miniatures AWI figures for the project that has been far too long on hold. Checking the blog I last painted a unit in January 2013!

First up two companies of Continental infantry in blue coats with red facings and buff breeches.


I then finished off the last dozen or so figures for a unit of Red-coats that have been pushed to the back of my painting bench since that last AWI painting session.


The bases are finished off with pumice gel and Woodland Scenics bushes and clumps with a final sprinkle of 1mm static grass.

Saturday, 10 May 2014

Battle of Monmouth Courthouse - 28th June 1778

Battle of Monmouth Courthouse - 28th June 1778


Yesterday evening, along with James W & James M we were invited over to Steves' house to play a rather spiffing game of the American War of Independence using his extensive collection of beautifully painted miniatures and terrain.

To kick off the evening Steve had prepared a rather yummy curry which we were soon tucking into and then it was down to business. Steve had set up the table to represent the Battle of Monmouth and sorted out the commands for the game, rather than the original units on the day. The forces, if I recall correctly, were:
The British
British rear guard
  • Rearguard - Commander, one Legion Dragoon sqdn, one small British Dragoon sqdn, 1 small Rifle detachment (sharpshooters), 1 large Hessian battalion.
  • Brigade - Colonel Webster, two large British battalions (fierce charge, elite 3+,  indomitable), two light guns.
  • Brigade - Commander, two British Guards battalions (fierce charge, elite 3+,  indomitable), one small Grenadier detachment (fierce charge, elite 3+,  indomitable), one small Light Infantry detachment(fierce charge, elite 3+,  indomitable), one light gun.
  • Brigade - Commander, three Scottish battalions (fierce charge, elite 3+,  indomitable)
  • Brigade - Commander, three Loyalist battalions.

The Americans
American advance guard
  • Advance Guard - Commander, one Dragoons, one small Infantry detachment, 1 small Rifle detachment (sharpshooters).
  • Advance Guard - Commander, one Dragoons, one small Infantry detachment, 1 small Rifle detachment (sharpshooters).
  • Brigade - Commander, three Infantry battalions, one small Rifle detachment (sharpshooters), one light gun.
  • Brigade - Commander, three Infantry battalions, one small Rifle detachment (sharpshooters), one light gun.
  • Brigade - Commander, four large Infantry battalions.

All the commanders were CV8 apart from Col Webster who was a 9. All the infantry were standard musket armed infantry units unless where noted.

The Game
After a quick roll off James W and myself would play the Rebels while Steve and James M would play the British and Loyalists. The forces of James and I were entering from a wood in the top corner of the table facing the rearguard in and around Monmouth Courthouse while the British troops would be approaching down the road in the opposite corner.
We soon set to, my advance guard immediately engaged the troops defending Monmouth Courthouse while the advance guard commanded by James crossed the ford and moved to attack from the other flank. rather than die a death of a thousand cuts from the accurate rifle fire, Steve deployed the Hessians from the town and moved to drive off my skirmishers. Unfortunately, the Hessians became disordered and were soon engaged in a fire-fight in the open.

The 23rd Royal Welch and the 33rd Foot under Col Webster were soon rushing to the fray and the British Guards were also deployed.

My second brigade moved on the table to support the attack on the town while James advanced over the ford and was soon deployed in the centre of the table.

The Hessians were having a hard time of it and soon they and the skirmishers were running for the rear, leaving only the cavalry to screen my troops from Monmouth Courthouse. The British Dragoons and Legion horse both charged and were both repulsed decisively, soon my rebels were deploying in Monmouth Courthouse ready to engage any British who tried to recapture it.

In the centre the rebel units under James quickly realised that they were never going to win a fire fight against the hardy troops under Colonel Webster so launched a charge, but blundered and instead took up positions in a cornfield to their left.

Colonel Webster launched his attack and the first American unit was swept away easily, but the second unit held and put up a stout fight which eventually swung their way causing the  33rd Foot to flee and reform! However the 23rd Royal Welch were soon giving cold steel to another American battalion so all was not so good.

A terrible set of rounds followed where the British commanders failed to get their troops into action (some terrible command rolls) and James and I soon capitalised. My troops that had taken Monmouth Courthouse crossed the bridge and started to engage the faltering Scots while our large brigade of infantry moved all the way behind our lines and started to deploy to threaten the British right. 

Soon both the 23rd Royal Welch and the 33rd Foot had been routed and the heroic Colonel Webster shot from his saddle, Time was getting on and things were not looking good for the British.

We had had some excellent luck, while that of the British, especially for their command rolls had been dire. 

 Here are a few more images, all the figures and terrain are from Steves' collection and were painted by himself.

The Hessians are routed.

Hessians and skirmishers stream through Monmouth Courthouse

Websters Brigade attacks


The rebels push on