Copyright © 2011-2026, Paul Scrivens-Smith

Copyright © 2011-2026, Paul Scrivens-Smith

All rights reserved. This work may not be reproduced, in whole or in part, without the prior written permission of the creator.

Showing posts with label Bolt Action. Show all posts

Sunday, 11 January 2015

For Sale: WWII British Infantry Platoon

THIS IS NOW SOLD


I'm a man with nine 28mmWWII British Infantry platoons and that really is far too many. So, I am selling my 'Normandy' infantry platoon along with it's supports.

I need the space for my new WWI Verdun project.

All the figures painted by myself and are mainly Warlord Games plastics with a few Black Tree Designs figures added along the way. You can see the original painting articles here, here, here and here.

Some of the figures have never been gamed with since being painted!

The force comprises:

Six officers and senior NCO's


First squad of NCO, eight Riflemen and a BREN gun.

Second squad of NCO, eight Riflemen and a BREN gun.

Third squad of NCO, eight Riflemen and a BREN gun.

Platoon support of a 2" Mortar team and a PIAT team

A 3" mortar team.

A mechanised squad of NCO, six Riflemen and a BREN gun.


An additional PIAT team and a Sniper


A Medic, two Orderlies and a stretcher case.

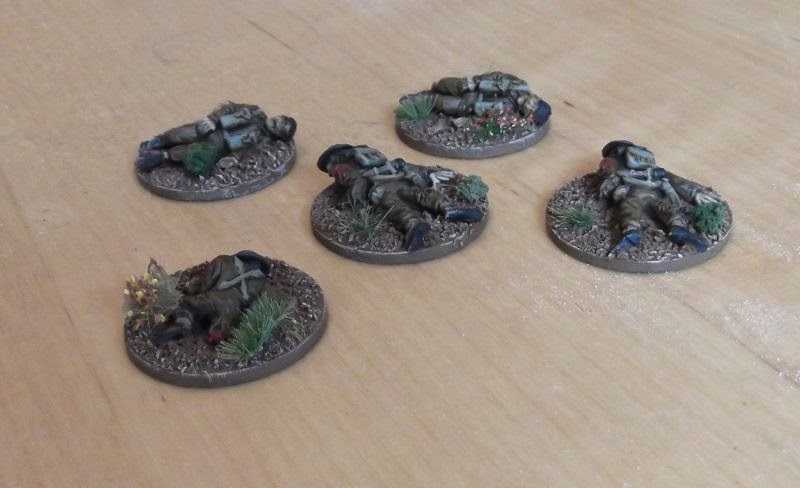
 Five casualty markers to denote pinned units etc.

Here are some close-ups:

NCO

 BREN Gunner


PIAT Gunner

Rifleman

Rifleman
 M3 half-track

M3 half track

 Casualty

Casualty

Another shot of the entire collection


So that is 63 figures plus a half-track, I'm looking at £225.00 for the lot.

Postage will be at cost and I will ship internationally.

Saturday, 7 June 2014

Polishing off a few oddments of WWII British


Back at the start of the year I was painting some Normandy British for the club Bolt Action league that appears to have fizzled out. You can see those here and here.

At the time I did a couple of boxes of the Warlord Games plastics, Black Tree Designs were having a sale on, so I picked up some other bit's and bobs to give the force a bit of character, but they were cleaned up and primed then languished in a box for a few months along with a couple of the Warlord Games infantry that had never gotten painted.

Over the past two weeks I made a effort to get them painted, culminating with finishing off the bases yesterday evening and a spray of matt varnish this morning.

They were fast painted using the same method as the earlier troops.

Here are a few close ups of the troops:

Black Tree Designs 3" Mortar:


 Black Tree Designs Medic and Stretcher Party


Warlord Games British Infantry


Black Tree Designs British Officers


Black Tree Designs British Casualties: 


 I also polished off a couple of Jump-off Points for Chain of Command, two of them are Renedra Barrels and the crate is from Great Escape Games.


Monday, 3 February 2014

'Battle Bus' for my Tommies


I've acquired a Warlord Game M3 half-track so have painted it up to carry one of my sections of British Infantry in our Bolt Action Games.

It's a pretty straight forwards kit to build, however I doubt that even the most competent modeller can remove the .50 from the sprues without breaking it - if you look closely at my photos you can see the repair. Also the cabin floor seems an odd fit at the back and does not seem quite long enough. But, despite these couple of niggles it's a nice enough kit that I managed to get base-coated in no time at all.

It's mainly Vallejo Bronze Green with a bit of Russian Uniform on the seats and Khaki on the small packs and camouflage netting hanging from the exterior.

Other painting pressures mean that it has stayed in this format for the last few weeks but tonight I ended that sad state of affairs and finished off with a couple of highlights and then applied weathering using a Tamiya mud stick and a Tamiya Weathering Master set.

The driver is the original US Army driver with a British head and helmet.

Unfortunately had to use flash photography so hope to take some during tomorrows game where it may look rather better. Although I don't know if you have the same issue, but as Bolt Action is not UGO-IGO I lose an opportunity to take photos while my opponent takes his move.


Saturday, 1 February 2014

More Bolt Action British infantry

Watch out Fritz Tommy Atkins is here to get you
After painting the original box of 25 I managed to pick up some more second hand to bring my force up to the 800pts needed for our club campaign.

I've painted another 22 of the Warlord Games late war British Infantry this week. This now takes me up to 47 of them done and I reckon that is likely all the ones I'll ever need.

These were painted using the same method that I used for the last 25 and I still reckon it's easier to paint them than to stick them together although I am getting the knack of that now.

I was not too keen on the previous PIAT gunner I made so I did knock up a new one.
New PIAT bloke

The models have had a coat of Testors Dullcote but they do look a bit shiny in the images.

I also picked up 17 Commandos as part of this deal, I think I'll likely just paint them up and sell them as I don't see me needing them for gaming.

Bren Gunner

Sniper

Sergeant

Officer with binoculars, can use as a Forward Observer

Wednesday, 15 January 2014

Bolt Action - Maximum Attrition

Yesterday evening Rich and I had a game of Bolt Action.

We had arranged that we would use forces based in North West Europe 1944 to 800pt lists and would let each other know if using anything over armour 7+

Eager to blood my new Tommies I picked the following list:

  • 1st Lieutenant & Sergeant
  • Forward Artillery Observer & assistant
  • Two sections 10 men including a Sten & Bren
  • One veteran section 10 men including a Sten & Bren
  • PIAT team
  • 2" Mortar team
  • Vickers MMG team
  • Carrier with extra pintle LMG
  • M3 half-track with extra pintle LMG

The additional troops needed were utilised from my Burma 14th Army force and I've tried not to include them in the photos, the M3 half-track is still being painted but was at a usable state.

Rich fielded the following German list:

  • 1st Lieutenant & two assistants
  • Medic & assistant
  • Three sections 10 men including two SMG & MG42
  • Sniper team
  • 8cm Mortar team
  • 75mm Infantry Gun team
  • Kubelwagen with pintle MMG
  • Sdkfz251/1

We set out the table as shown, a bombed out village ran along a cross roads, one side was heavily wooded and the other a mixture of standing crops and ploughed fields.

Rolling for a mission it came up Maximum Attrition.

Things started well for the Germans, on his first attempt Rich hit the M3 with his Mortar rolling a 6 to hit and then a 6 to penetrate! The infantry section bailed out and rolling for casualties he only got a single hit, but 'double-sixed' that roll to take out the corporal.
Things were not going well for the British, the light mortar team targeted the sniper for five consecutive turns, and still failed to hit on a 2+ roll, for the sniper to then take notice of them and kill them outright.

Infantry bail out of the destroyed half-track
The PIAT team went on a wide flanking manouver and had a shot at the German half-track only to find out just how difficult it is to hit with a shaped charge weapon at long range against a target in cover when you are moving! The PIAT team was soon dealt with.
PIAT team attempt a flanking manoeuvre 
Fritz did not have it all their own way though, a well placed bombardment put a lot of pins on his right flank and the British exploited that, the SdKfz251/1 failed a roll to activate and one British section house-hopped up the table and launched an assault, polishing off the German HQ and then consolidating next to the half-track destroying it. They subsequently performed the same manoeuvre on the German medics and took out the Kubelwagen in the same way.
Tommies advance up the road
On my right flank, the Veteran section supported by the carrier polished off one German infantry section and then mopped up the sniper. After several effective turns against the Germans the Vickers succumbed to mortar fire on the last turn just before the 8cm mortar itself succumbed!

By the end of the game, all I had remaining were the remnants of my three infantry sections, my Bren carrier and my HQ, but the Germans had lost everything apart from their Infantry Gun and about half a section of infantry. Touch and go, but a good victory for the British.


Monday, 13 January 2014

Warlord Games British Infantry - Easier to paint than assemble?

Warlord Games British Infantry
On Tuesday I traded from Phil a box of Warlord Games WWII British infantry for some Flames of War Shermans that I was never going to paint.

So On Wednesday lunchtime I got the sprue cutters, sharp knife and glue out and made a start - well what a ball-ache these things are.

  • Far too many pieces than are really necessary especially compared to the lovely Desert Rats done by the Perrys. 
  • Once assembled they don't look to good either, all the weapons are fine scale, but the figures have the great big hands and faces that are the norm in wargame figures these days so the guns look rather dainty. 
  • Regarding the dainty weapons, the moulds are not laid out too well, it's nigh on impossible to get some weapons off without breaking them.
  • Some weapons are really easy to break once on the figure, the Bren barrel is far too thin.
  • There is a good right arm throwing a grenade, but no left arm that can hold the rifle or SMG in a natural position.

By Thursday evening though I had got them all assembled here are a couple of tips to help with your blood pressure:

  • Use Revell Contacta cement, get what adhesive you want where you need it!
  • Read the instructions and ensure you are using the right hands for the weapon you are going to use
  • Stick the weapon into the right hand of the figure, when that is dry stick the right arm with weapon onto the torso then stick the left arm in place.
  • Be careful not to break any of the more delicate weapons.

On Friday evening I stuck some texture on the bases and gave them all a spray with Halfords grey car primer and then followed up in the morning with some Army Painter Leather Brown.
Warlord Games British Infantry

Once dried the figures were given a basecoat of Vallejo English Uniform, the uncovered helmets, 2" mortar and PIAT were painted Bronze Green. The covered helmets and any visible blanket rolls were painted Russian Green. The webbing, packs, gaiters and gas mark case were painted Khaki as were some patches of foliage on the helmets. The rifle butts and entrenching tool handles were done in Saddle Brown as were some patches of foliage on the helmets. The weapon fittings, boots, bayonet scabbard, etc. were painted in Black. The flesh was then painted in a mix of Saddle Brown and Basic Fleshtone.
Doing this on all twenty five figures only took two or three hours.

The figures were then washed with Vallejo Sepia Wash. Once dried I made a start on the highlights - the uniform does not need highlighting!

  • The Khahi was highlighted using first Khaki and then a mix of Khaki and Pale Sand.
  • The Bronze Green was highlighted using first Bronze Green and then a mix of  Bronze Green and Russian Uniform.
  • The Russian Uniform was highlighted using first Russian Uniform and then a mix of  Russian Uniform and Pale Sand.
  • The Saddle Brown was highlighted using first Saddle Brown and then a mix of  Saddle Brown and Pale Sand.
  • The Black boots and bayonet scabbard was highlighted using Black Grey.
  • The bayonets were painted Gunmetal Gray and then highlighted with Silver.
  • The weapon fittings were highlighted with a mix of Gunmetal Grey and Black.
  • The flesh was highlighted using Basic Fleshtone and then Basic Fleshtone mixed with a little Ivory.

Although transfers are provided I painted on the unit patches and rank stripes by hand.
Finally some detail on the hands faces and weapons was picked out using Windsor & Newton Peat Brown Ink.
All colours apart from the ink are from the Vallejo Model Colour range.

Again, like the base-coat the highlights only took a couple of hours.

I reckon I spent less time painting them than building them.

Here are some more shonky close-up pictures!


Corporal with Thompson

Corporal with Thompson

SMLE Rifle

SMLE Rifle

SMLE Rifle

SMLE Rifle

Bren Gun

Bren Gun

SMLE Rifle

SMLE Rifle